Grouting floor tiles might seem just a finishing step, but it is a very essential component of the tile installation. The right grout, tools, and application will determine whether your floor looks professionally installed or like a DIY attempt.
Working with hundreds of landscapers, we can confidently say that a perfect tile layout can be instantly ruined by poor grouting, and average tile work can look exceptionally well if the grout is professionally done.
In this extensive guide, we will take you through in-depth knowledge of grouting the kitchen, living room, bathroom, hallway, and bedroom floors. By the end of this guide, you will have a clear idea of how to grout floor tiles properly, what to avoid, and how to achieve that clean and smooth look while tiling your wall, floor, or patio.
What Is Grouting and Why Does It Matter for Indoor Floor Tiles
Grouting is the process of filling the gaps between tiles with specially formulated material, called grout. The gaps between the tiles are known as grout joints. They are not just for aesthetics, but they are one of the essentials that serve a very important structural and protective purpose.
The Purpose of a Strong Grout Joint
When properly done, the best tile grouts:
- Locks the tiles in place
- Prevents water from getting into the grout lines, causing tile failure
- Prevents tile chipping
- Accommodates minor tile movements
- Enhances floor durability
- Provides a finishing touch
Without proper grouted joints, your tiles can get loose, crack, and allow water to seep underneath, especially in kitchens and bathrooms.
How Grouting Protects Against Moisture and Damage
When you tile in the moisture-prone areas like
- Kitchen floors
- Bathroom floors
- Entryways
Hallways
You also need to follow the step-by-step grouting guide to grout professionally to prevent water from seeping beneath tiles. Improper grout can damage subflooring and cause mould growth.
Common Grouting Mistakes Homeowners Make
Here are some of the most common mistakes homeowners make while grouting their indoors:
- Using the wrong type of grout
- Making too watery grout
- Not waiting for the grout to cure
- Skipping grout sealer
Avoid these mistakes so that your tiling looks professional, not DIY work.
Types of Floor Tiles That Require Grouting
Almost all indoor tiles need to be grouted; nevertheless, the type of tiles affects the grout selection and technique.
Porcelain Tile
Porcelain is a dense, low-porosity, and durable floor tile. It’s ideal for:
- Living rooms
- Hallways
- Kitchens
- Bathrooms
- High-traffic areas
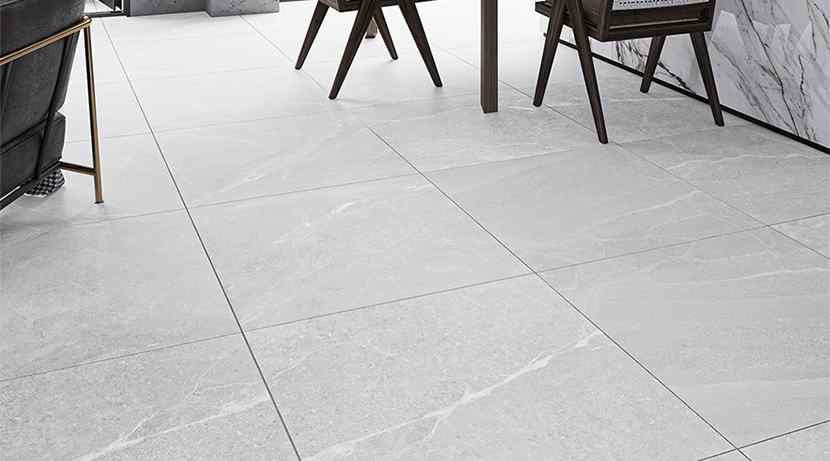
Porcelain has high tolerance for moisture and stains, which is why tile and porcelain tile grout cleanup is easier. For instance, timber planks look great and natural, while wood-effect tiles last longer and are easier to clean and maintain.
Ceramic Tile
Ceramic tiles are more porous than porcelain, but are more preferable due to being budget-friendly and still excellent for UK homeowners. It’s very common to be used in bedrooms and low-traffic indoor spaces.
Protip: Our porcelain vs ceramic tiles help you choose tiles according to your requirements, affecting your decision of grout material.
Natural Stone Tiles
It is very important to grout the natural stone tiles carefully, as it stains and can be stained and ruined permanently.
- Marble tile
- Granite tile
- Slate tile
- Travertine tile
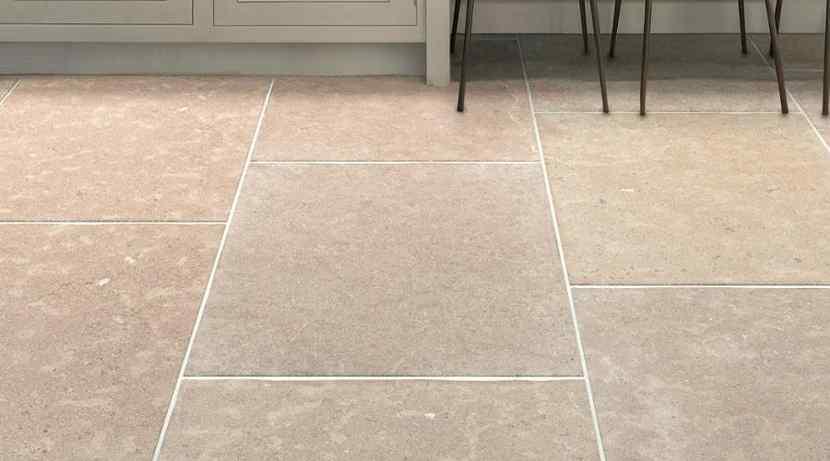
Protip: Pre-seal stone surfaces before grouting in order to prevent staining.
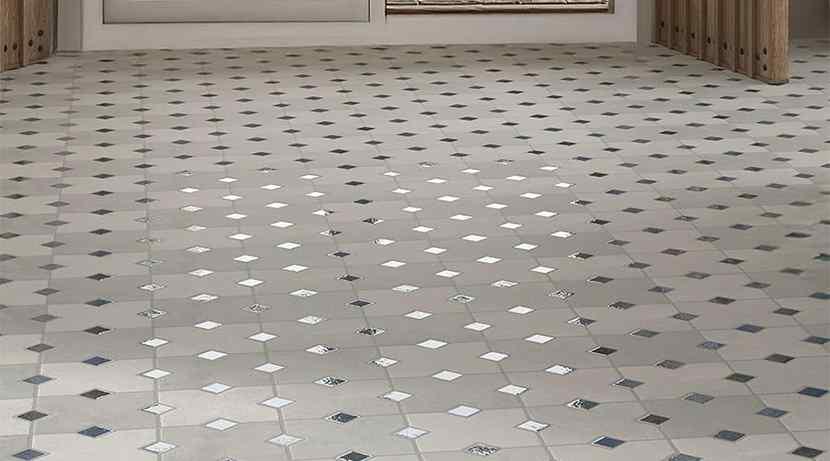
Mosaic Tile
Mosaic tiles have more grout lines per square foot, which means:
- More grout required
- More careful cleaning is needed
- More attention to uniform joint filling
Choosing the Right Type of Grout for Indoor Floors
If you want the laid tiles to last for years, with the best durability, stain resistance, and joint strength, you need to select the correct grout.
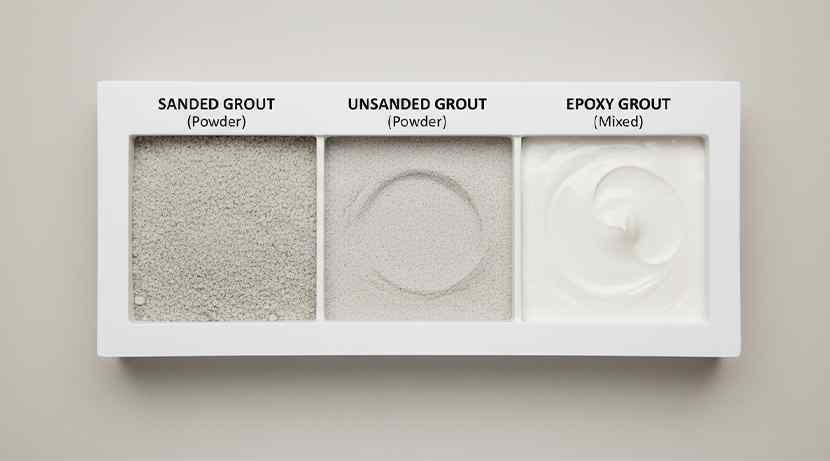
Sanded Grout
Sanded joints are best for wider joints. Use sanded grout when the joint width is ⅛ inch or wider. It is suitable for square or checkerboard porcelain or ceramic floor tiles alike.
When you use sanded grout, you
- Reduce the likelihood of shrinkages
- Increase the strength of grout joints
- Make it suitable for high-traffic areas in your home
Unsanded Grout
Ideal for tight gaps, unsanded grout is best for joints smaller than ⅛ inch. Mostly used for large format tiles in modern homes. Use unsanded grout to avoid scratching and achieve a polished stone surface.
Unsanded grout provides a smooth finish but is less durable in wide joints.
Epoxy Grout
Epoxy grout has been a UK favourite for kitchens and bathrooms. It is because epoxy grout is:
- Highly stain-resistant
- Water-resistant
- Mold-resistant
- Extremely durable
People mostly have queries about:
- How to grout shower tiles
- How to grout a bathroom
- How to grout wall tiles
Well, this non-shrink grout is ideal for kitchen floor tiles, kitchen wall tiles, bathroom floor tiles and shower tiles. However, epoxy grout is more expensive and harder to work with than other grouting options.
When (and When Not) to Use Furan Grout
Furan grout is a high performance two component 100% solid grouting compound. It is a polymer-based industrial grout renowned for extreme chemical resistance, with a temperature up to 176.667°C
Furan grout is typically used in industrial or commercial spaces. Landscapers and project managers very rarely use furan grout for residential interior flooring.
Tools You Need to Grout Floor Tiles Like a Professional
If you want your indoor floor tiles to look professionally finished, use the right tools:
Essential Application Tools
- Grout float
- Margin trowel
- Mixing paddle
- Bucket
A rubber grout float is essential for forcing grout deep into joints.
Cleaning & Finishing Tools
- Grout sponge
- Microfiber cloth
- Rubber gloves
If you are wondering how to clean grout, a proper tile sponge is what you need. It prevents over-washing and gouging out the grout lines.
Supporting Installation Materials
- Tile spacers
- Thin-set mortar
- Backer board
Make sure that the thin-set mortar is fully cured before grouting.
How to Prepare Indoor Floors Before Grouting
How you prepare for tiling and grouting your floor tiles determines the final look of your interior floors.
Ensuring Proper Curing Time
Allow your tiling grout to cure for 24 to 48 hours before starting to grout. Grouting too early can weaken the overall installation.
Cleaning Excess Thin-Set from Joints
Use a utility knife or a margin trowel to remove hardened mortars from joints.
Checking Expansion Gaps
Leave expansion joints at:
- Room perimeters
- Door thresholds
- Wall transitions
These should not be filled with rigid tile grout.
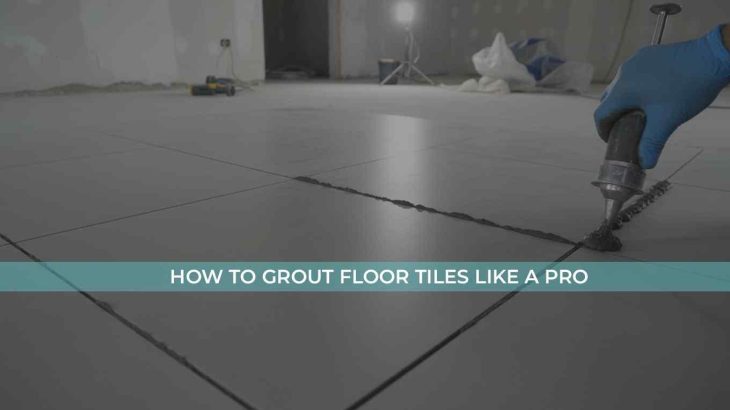
Step-by-Step Guide to Grouting Floor Tiles
Here is a professional process that you can follow if you want a smooth finish:
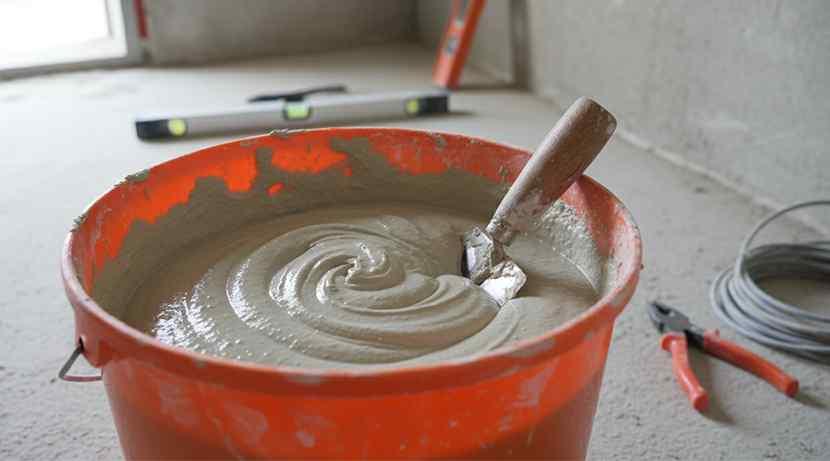
Step 1: Mixing the Grout to the Right Consistency
Add grout powder to water, not the contrary. Aim for the consistency of peanut butter. Give it a rest for 5 to 10 minutes and then remix it.
Step 2: Applying Grout with a Grout Float
Hold the float at a 45-degree angle. Spread the grout diagonally across the tiles. Press the grout firmly to pack joints between the tiles. Work in small sections of the space.
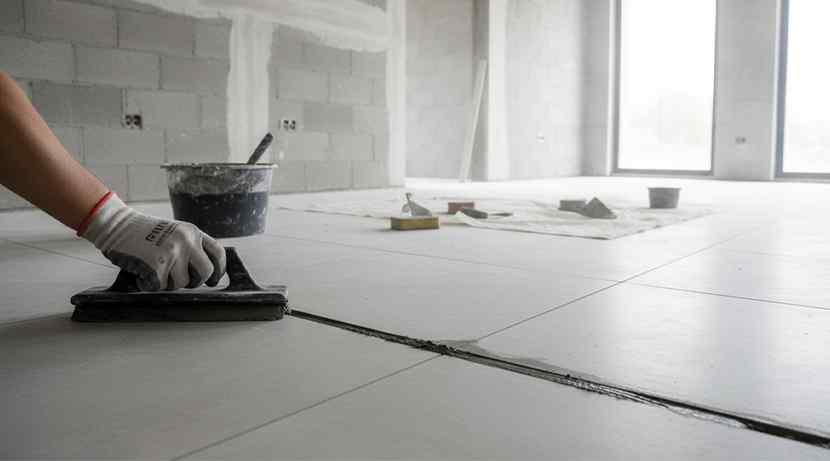
Step 3: Packing the Grout Joints Properly
When you grout, make sure that the joints are fully filled, have no air pockets and are slightly overfilled. When the joints are incomplete, there is a high likelihood of cracks and the moisture seeping beneath the tiles.
Step 4: Cleaning Initial Grout Haze
20 minutes after grouting,
- Use a damp sponge
- Wipe diagonally
- Rinse frequently
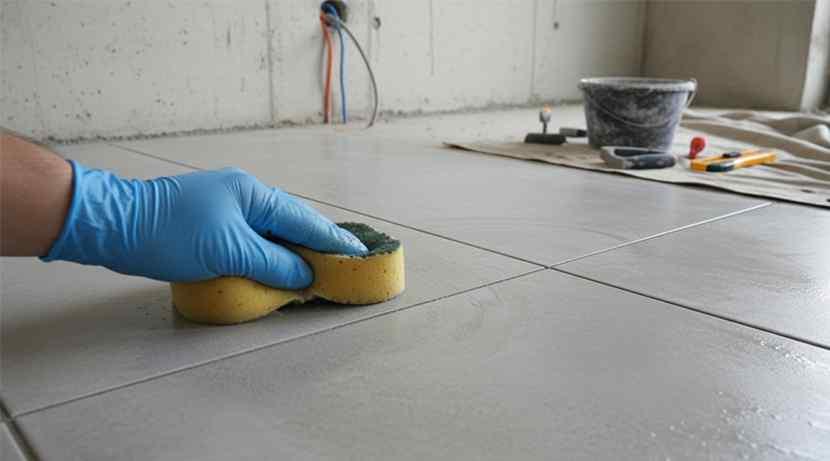
Do not oversaturate.
Step 5: Final Buffing and Finishing
After the grout gets firmed up,
- Use a dry microfiber cloth
- Buff surface
- Remove remaining haze
How Long Does Grout Take to Dry?
The drying time for grout is typically 24 hours for light foot traffic, but the full cure time is 72 hours. Seal the grout and let it cure for 48 to 72 hours.
Note: The humidity and temperature affect the curing time of your floors.
How Much Grout Do You Need for Floor Tiles?
Grout coverage depends on tile size, tile thickness, and joint width. Smaller tiles and mosaic patterns require more grout.
Note: Always buy 10–15% extra to avoid colour mismatch.
Sealing Grout for Long-Term Durability
For your grout to look professionally done and last for years, it is important that you seal it. Grouts are porous and need protection.
Why You Should Apply Grout Sealer
When you seal your tile grout lines, you,
- Prevent stains from dirt and constant use
- Reduce moisture absorption between the lines
- Extend the lifespan of your grout lines
- Make cleaning bathroom tiles easier
Apply the sealer over the newly grouted joints 48-72 hours after installation.
When to Use Tile Sealer on Natural Stone Floors
Use natural stone tile sealers on natural stone tiles before and after grouting the joint lines.
Removing Residue with Grout Haze Remover
If you see haze after curing, use a grout haze remover following the instructions on the packaging.
Grouting Tips for Different Indoor Spaces
| Space | Recommended Grout Type | Specific Tips |
| Bathrooms & Wet Rooms | Epoxy is highly water and stain-resistant and doesn’t require sealing. | Allow the grout to cure (often 1-2 weeks for showers) before exposure to water. Use a sealant on cement-based options for added protection against moisture and mould. |
| Kitchen Backsplashes | Unsanded grout is suitable for the typical narrow joints (less than 1/8 inch or 3mm). Epoxy grout is also an excellent, low-maintenance, stain-resistant choice for messy cooking areas. | Be careful using sanded grout with easily scratched surfaces like glass or polished stone. Use a matching silicone caulk where the backsplash meets the countertop. |
| General Floors (Living Room, Hallway) | Sanded grout for wider joints (1/8 inch/3mm or more) to provide strength and prevent cracking/shrinkage. Use a flexible grout if underfloor heating is present. | Avoid using white grout on high-traffic floor areas, as it stains easily; opt for light grey or darker shades instead. Wait at least 24-72 hours before walking on newly grouted floors. |
Solving Common Grout Problems
We have jotted down some of the most common grout problems landscapers and homeowners face while grouting their indoor spaces.
Fixing Cracked or Shrinking Grout
Cracked tiles or shrinking grouts are mostly caused by too much water added in the grout mix, wide grout joints with unsanded grout and structural movements in the space.
For this, it is important that you remove the damaged grout and reapply it with more precision, using the correct grout and method.
Dealing with Efflorescence
Efflorescence is the white residue that appears as a white powder on the grout. It is mostly caused by excess moisture in space and mineral migration.
Clean efflorescence with mild acidic cleaners and with the recommendation provided on the back of the cleaners.
Preventing Stains and Discolouration
To prevent the tile grout from being discoloured or stained,
- Seal the grout properly
- Clean grout spills immediately with a grout cleaner
- Avoid using harsh chemicals
Conclusion
When you fill the gaps with the right grout and a proper plan, you ensure your indoor floor tiles’ longevity, appearance, structural integrity, and maintenance level.
Whether you would like Royale Stones porcelain tiles for kitchens, ceramic tiles for bedrooms, or stone tiles for bathrooms of your home, it is crucial to follow proper mixing, application, cleaning and sealing techniques for a flawless result each time.
Take your time, research thoroughly on how to grout floor tiles, and use the right material and approach to grout the tiles. That is how you grout your floor tiles like a true professional and make your space feel cohesive and clean.
FAQs for How to Grout Tiles
How long do you leave grout before wiping off?
Typically, 20-30 minutes is required for the grout to dry off before you start wiping off the excess grout with a damp sponge. Just to be careful, touch the grout; if it feels firm to the touch but not completely hard, it’s good to be wiped.
What is the best way to apply grout?
Use a rubber grout float at 45 degree angle, force the grout into the joints with diagonal strokes. Work in small, manageable areas, scrape off the excess grout with the float edge before letting it dry. Clean the excess stains with a damp sponge after 20 to 30 minutes of applying grout.
What are common grouting mistakes?
Premature application of the grout over the newly laid tiles (let the adhesive stick up to 24 hours at least), incorrect water ratio that weakens the grout, causing shrinkage and cracking, wiping the excess grout too soon, gouging the grout, and improper tools are some of the most common mistakes.
Can I just grout over existing grout?
No, it is not a good idea to grout over old grout if you want a long lasting and professional result. For cosmetic cases, grout pens, grout paint, or grout over grout can temporarily work, but in most situations, it can lead to cracking, flaking or bonding failure.